Friday, February 26, 2016

Add AdMob to Ionic Framework [Update]

Add AdMob to Ionic Framework

1. Add AdMob Plugin to your project


cordova plugin add cordova-plugin-admobpro
2. Create the banner in your AdMob account
3. add in the app
Add this code to your app (app.js)

1
2
3
4
5
6
7
8
9
10
11
12
13
14
if( ionic.Platform.isAndroid() )  {
        admobid = { // for Android
          banner: ‘you pub’
        };

        if(AdMob)
          AdMob.createBanner(
            {
              adId:admobid.banner,
              position:AdMob.AD_POSITION.BOTTOM_CENTER,
              autoShow:true
            }
          );
    }


endjoy :)

Thursday, February 25, 2016

การเตรียมความพร้อมสำหรับการเขียน Android


วันนี้จะมาบอกเกี่ยวกับการเตรียมตัวสำหรับการจะก้าวมาเป็นนักพัฒนา Android  สำคัญที่สุดเลยครับคือการที่เราเข้าใจและสามารถใช้ภาษา java ได้ในระดับหนึ่งครับ เป็นสิ่งแรกเลยที่เราควรจะศึกษาก่อนจะเริ่มต้นนะครับผม :) 


  • ส่วนแรกเลยคือการเตรียมเครื่องมือให้พร้อม


ไม่ใช่ว่าคอมอะไรก็สามารถนำมาใช้ได้นะครับเพราะเจ้า Android นั้นค่อนข้างที่จะกินสเปกเครื่องอยู่พอสมควรเลย  ดั้งนั้นผมจึงแนะนำ Intel Core I3 ขึ้นไปนะครับ สำหรับแรมนั้น  8 GB กำลังดีครับเพราะเวลาใช้ไปนานๆเขียนเยอะขึ้นๆ ทั้งเปิด  Chrome และอะไรต่างๆจนมันจะหนักขึ้นเรื่อยๆและเครื่องช้าในที่สุดเป็นเรื่องธรรมดาอยู่แล้ว ฮ่าๆ  ที่เหลือก็ตามความสะดวกของแต่ละท่านเลย

                 และที่สำคัญที่สุดที่ผมคิดนั้นคือ อินเตอร์เน็ต เป็นสิ่งที่ขาดไม่ได้เลยครับเพราะเวลาเราเจอบัคหรืออะไรก็ตามจนทำให้ไปต่อไม่ได้ Google ช่วยเราได้เยอะครับ 

                สุดท้ายเลยคือ เครื่องแอนดรอยด์ เพราะสุดท้ายเราต้องทำการทดสอบกับของจริงครับเพื่อความสบายใจของเรา


  • ส่วนที่สองคือโปรแกรมต่างๆที่ต้องเตรียมให้พร้อม


สุดท้ายนี้คือการที่เราขยันเขียนเพื่อที่จะได้จำคำสั่งต่างๆได้อย่างรวดเร็วนะครับไม่จำเป็นต้องจำทั้งหมดแค่ส่วนหนึ่งก็พอ เพราะยังไงเราก็มีพี่ google ข้างกายเราตลอดเวลา  สำหรับใครที่เขียนแล้วอยากอัพขึ้นไปขายใน Google Play Store นั้ต้องเสียเงินสมัครประมาณที่ 25 ดอลนะครับ ไว้จะมาเล่าให้ฟังในครั้งหน้าครับวันนี้ขอให้ทุกคนเตรียมตัวให้พร้อมนะครับ :) 

Android Studio Tips and Tricks Part1

Android Studio Tips and Tricks

  • Android Studio Tips #1: Customizing Android Studio with Themes:

A good theme provides visual feast to our eyes and makes our code look much better and stay much more time coding. Android Studio provides many themes that you can use to completely change the look of your IDE. 
You can download these by clicking this link.
Installation Process for themes:
On Windows, Click on File > Import Settings and select the jar file you downloaded from the above link. After Importing, it will prompt for restarting Android Studio. Restart it After the IDE restarted go to the Settings > Editor > Colors and Fonts tab and choose installed theme. You will see the new theme applied.
One of my favorites is the theme that is similar to Sublime Text 2, the most popular, powerful and widely text Editor. This theme is a visual delight and makes your code most colorful. You can download the theme from here.

  • Android Studio Tips #2: Develop code faster using Keyboard Shortcuts:

Do you know that Android Studio is intelligent enough to guess your code and auto completes it for you? Android Studio’s smart code completion completes your code or filters the list of methods and variables just by hitting Ctrl + Shift + Space on your keyboard. Ever stuck with what type of methods the parameter takes in? Ctrl + Space solves our problems by showing the type of variables we need to declare. Want to search for any variable or class or method every where? We can do this by using Double Shift.
There are plenty of shortcut codes which make your life easier and help you code much faster. You don’t even need to remember these shortcuts. Just followthis link and download the pdf so that you can use this as a reference for keyboard shortcuts.

  • Android Studio Tips #3: Display line numbers for the code:

One of the most commonly used feature in Eclipse is the display of line numbers which can also be enabled in Android studio. You can enable them by going toFile>Settings> Editor> Appearance and check-marking Show line numbers option.

  • Android Studio Tips #4: Display documentation on hover:

Another most important feature in Eclipse that is mostly useful is the display of documentation on hover. This is also disabled by default in Android Studio. We can enable it by going to File > Settings > Editor > General. If we scroll down a bit, we can see other > Show quick doc on mouse move. Check this. You can also adjust time delay that the document displays after hovering. Hit Apply and now you can now see quick doc on hovering mouse on any piece of code. (Alternatively you can also use Ctrl + Q to display the documentation.)

  • Android Studio Tips #5: Using Genymotion – A Fast Android Emulator:

Ever felt that Traditional Android Studio’s Emulator is not upto the mark compared to a real device. If so, you should try Genymotion – a fast Android Emulator with many features. We have covered in another Article in detail about Genymotion, How to install it and How to Configure it and use it in Android Studio. Here is the link to it:

  • Android Studio Tips #6: Format the code with proper Indentation:

If your code felt clumsy and unreadable, Just press Ctrl + Alt + L. This will automatically indent the code and Format it.
Have more tips? Share them in the Comments Section!


Wednesday, February 24, 2016

Ionic Framework อีกขั้นหนึ่งของการทำแอพพลิเคชั่น

Ionic Framework  อีกขั้นหนึ่งของการทำแอพพลิเคชั่น

มีหลายคนถามว่าไอเจ้า "Ionic Framework" นี่มันคืออะไรกันแน่ แล้วมันเหมือน "Cordova" หรือป่าว ผมอยากจะอธิบายให้ฟังง่ายๆว่า Ionic Framework นั้นถือเป็น  Framework  อย่างแท้จริงซื้อต่างจาก Cordova ที่เป็นแค่ตัวหุ้ม HTML และ Java script แค่นั้นเองครับ   พูดง่ายๆก็คือ Ionic Framework เป็น การเติมเต็ม App แบบ Hybrid มากกว่า

ข้อเด่นๆของเจ้า Ionic Framework นั้นจะมีดั้งต่อไปนี้ครับ


  • Ionic Framework  มี UI ที่ลื่นไหลกว่า
  • Ionic Framework ใช้ Angular js ทำให้ง่ายต่อการพัฒนามากขึ้นนั้นเอง
  • Ionic Framework ยังใช้ Cordova เป็นตัวสร้าง apk อยู่ ทำให้ยังคงความเป็น cross platform อยู่นั้นเอง


สรุปเลยเลยนะครับ Ionic Framework มีความง่ายในการเข้าถึงและมีความเร็วที่ดีกว่าอาการแลคนั้นน้อยลงจริงครับ ซึ่งถ้าจะติดมันก็อยู่ที่ว่าเราต้องไปเรียนรู้การใช้ Angular js ใหม่เท่านั้นเอง Ionic Framework จึงเป็นการเปิดโอกาศให้กับนักพัฒนาหน้าใหม่ได้มีแอพพลิเคชั่นดีๆออกมาสู่ตลาดนั้นเองครับ


วันนี้ก็พอเท่านี้นะครับไว้ไปลองอะไรใหม่มาแล้วจะมาเล่าสู่กันฟังอีกครั้งครับผม :) 

create menu android studio

create menu android studio


  • follow me in mian.xml

<menu xmlns:android="http://schemas.android.com/apk/res/android" >

    <item
        android:id="@+id/action_settings"
        android:orderInCategory="100"
        android:showAsAction="never"
        android:title="@string/action_settings"/>
   
    <item
        android:id="@+id/action_up"
        android:orderInCategory="100"
        android:showAsAction="ifRoom|withText"
        android:icon="@android:drawable/arrow_up_float"
        android:title="Up"/>
    <item
        android:id="@+id/action_down"
        android:orderInCategory="100"
        android:showAsAction="ifRoom|withText"
        android:icon="@android:drawable/arrow_down_float"
        android:title="Down"/>
    <item
        android:id="@+id/action_other"
        android:orderInCategory="100"
        android:showAsAction="ifRoom"
        android:icon="@drawable/ic_launcher"
        android:title="Other"/>

</menu>


  • In MainActivity.java


package com.example.androidmenu;

import android.os.Bundle;
import android.app.Activity;
import android.view.Menu;
import android.view.MenuItem;
import android.widget.Toast;

public class MainActivity extends Activity {

 @Override
 protected void onCreate(Bundle savedInstanceState) {
  super.onCreate(savedInstanceState);
  setContentView(R.layout.activity_main);
 }

 @Override
 public boolean onCreateOptionsMenu(Menu menu) {
  // Inflate the menu; this adds items to the action bar if it is present.
  getMenuInflater().inflate(R.menu.main, menu);
  return true;
 }

 @Override
 public boolean onOptionsItemSelected(MenuItem item) {
 
  switch(item.getItemId()){
  case R.id.action_settings:
   Toast.makeText(getApplicationContext(),
     "Setting...",
     Toast.LENGTH_SHORT).show();
   break;
  case R.id.action_up:
   Toast.makeText(getApplicationContext(),
     "Up...",
     Toast.LENGTH_SHORT).show();
   break;
  case R.id.action_down:
   Toast.makeText(getApplicationContext(),
     "Down...",
     Toast.LENGTH_SHORT).show();
   break;
  case R.id.action_other:
   Toast.makeText(getApplicationContext(),
     "Other...",
     Toast.LENGTH_SHORT).show();
   break;
  default:
   Toast.makeText(getApplicationContext(),
     "Unknown...",
     Toast.LENGTH_SHORT).show();
   break;
  }
 
  //Return false to allow normal menu processing to proceed,
  //true to consume it here.
  return false;
 }

}


How Do I Get A Button To Open Another Activity In Android Studio

How Do I Get A Button To Open Another Activity In Android Studio


Using an OnClickListener

Inside your Activity instance's onCreate() method you need to first find your Button by it's id using findViewById() and then set an OnClickListener for your button and implement the onClick() method so that it starts your new Activity.
Button yourButton = (Button) findViewById(R.id.your_buttons_id);
 
yourButton.setOnClickListener(new OnClickListener(){
    public void onClick(View v){                        
        startActivity(new Intent(YourCurrentActivity.this, YourNewActivity.class));
    }
});
This is probably most developers preferred method. However, there is a common alternative.


Using onClick in XML

Alternatively you can use the android:onClick="yourMethodName" to declare the method name in your Activity which is called when you click your Button, and then declare your method like so;
public void yourMethodName(View v){
    startActivity(new Intent(YourCurrentActivity.this, YourNewActivity.class));

}    

Monday, February 22, 2016

Webview android studio Full

Hi guy

Follow me Now Create Webview !!! 


  •  in class MainActivity

import com.google.ads.mediation.AbstractAdViewAdapter;
import com.google.android.gms.ads.AdRequest;
import com.google.android.gms.ads.AdView;
import com.google.android.gms.ads.InterstitialAd;
import com.google.android.gms.appindexing.Action;
import com.google.android.gms.appindexing.AppIndex;
import com.google.android.gms.common.api.GoogleApiClient;

import android.app.Activity;
import android.net.Uri;
import android.os.Bundle;
import android.support.v7.app.AppCompatActivity;
import android.view.Menu;
import android.view.MenuItem;
import android.webkit.WebSettings;
import android.webkit.WebView;
import android.webkit.WebViewClient;
import android.widget.Toast;


public class MainActivity extends AppCompatActivity {

            private WebView myWebView;
    /**     * ATTENTION: This was auto-generated to implement the App Indexing API.     * See https://g.co/AppIndexing/AndroidStudio for more information.     */    private GoogleApiClient client;

    @Override    protected void onCreate(Bundle savedInstanceState) {
        super.onCreate(savedInstanceState);
        setContentView(R.layout.activity_main);


       /*String url1 = "http://mathematicalchill.blogspot.com" ;        WebView view = (WebView) this.findViewById(R.id.webView);        view.getSettings().setJavaScriptEnabled(true);        view.setWebViewClient(new WebViewClient());*/        WebView myWebView = (WebView) findViewById(R.id.webView);
        WebSettings webSettings = myWebView.getSettings();
        webSettings.setJavaScriptEnabled(true);
        myWebView.loadUrl("http://mathematicalchill.blogspot.com");
        myWebView.setWebViewClient(new MyAppWebViewClient());


        // Load an ad into the AdMob banner view.        AdView adView = (AdView) findViewById(R.id.adView);
        AdRequest adRequest = new AdRequest.Builder()
                .setRequestAgent("android_studio:ad_template").build();
        adView.loadAd(adRequest);

        // Toasts the test ad message on the screen. Remove this after defining your own ad unit ID.
        // ATTENTION: This was auto-generated to implement the App Indexing API.        // See https://g.co/AppIndexing/AndroidStudio for more information.        client = new GoogleApiClient.Builder(this).addApi(AppIndex.API).build();
    }

    @Override    public void onBackPressed()
    {
        if (myWebView.canGoBack()) {
            myWebView.goBack();
        } else {
            super.onBackPressed();

        }
    }

    @Override    public boolean onCreateOptionsMenu(Menu menu) {
        // Inflate the menu; this adds items to the action bar if it is present.        getMenuInflater().inflate(R.menu.menu_main, menu);
        return true;
    }

    @Override    public boolean onOptionsItemSelected(MenuItem item) {
        // Handle action bar item clicks here. The action bar will        // automatically handle clicks on the Home/Up button, so long        // as you specify a parent activity in AndroidManifest.xml.        int id = item.getItemId();

        if (id == R.id.action_settings) {
            return true;
        }

        return super.onOptionsItemSelected(item);
    }

    @Override    public void onStart() {
        super.onStart();

        // ATTENTION: This was auto-generated to implement the App Indexing API.        // See https://g.co/AppIndexing/AndroidStudio for more information.        client.connect();
        Action viewAction = Action.newAction(
                Action.TYPE_VIEW, // TODO: choose an action type.                "Main Page", // TODO: Define a title for the content shown.                // TODO: If you have web page content that matches this app activity's content,                // make sure this auto-generated web page URL is correct.                // Otherwise, set the URL to null.                Uri.parse("http://host/path"),
                // TODO: Make sure this auto-generated app deep link URI is correct.                Uri.parse("android-app://com.(Youpackage)/http/host/path")
        );
        AppIndex.AppIndexApi.start(client, viewAction);
    }

    @Override    public void onStop() {
        super.onStop();

        // ATTENTION: This was auto-generated to implement the App Indexing API.        // See https://g.co/AppIndexing/AndroidStudio for more information.        Action viewAction = Action.newAction(
                Action.TYPE_VIEW, // TODO: choose an action type.                "Main Page", // TODO: Define a title for the content shown.                // TODO: If you have web page content that matches this app activity's content,                // make sure this auto-generated web page URL is correct.                // Otherwise, set the URL to null.                Uri.parse("http://host/path"),
                // TODO: Make sure this auto-generated app deep link URI is correct.                Uri.parse("android-app://com.(Youpackage)/http/host/path")
        );
        AppIndex.AppIndexApi.end(client, viewAction);
        client.disconnect();
    }

    private class MyAppWebViewClient extends WebViewClient {
    }


}

  • inclass MyAppWebviewClient


import android.content.Intent;import android.net.Uri;import android.webkit.WebView;import android.webkit.WebViewClient;
/** * Created by maxx on 22/2/2559. */public class MyAppWebViewClient extends WebViewClient {


    @Override    public boolean shouldOverrideUrlLoading(WebView view, String url){

        if(Uri.parse(url).getHost().endsWith("http://mathematicalchill.blogspot.com")) {
            return false;
        }

        Intent intent = new Intent(Intent.ACTION_VIEW,Uri.parse(url));
        view.getContext().startActivity(intent);
        return true;
    }
}


Now check parameter is correct


Samsung Galaxy S7

รวมฟีเจอร์ใหม่ที่เข้ามาใน Samsung Galaxy S7 !!!

อย่าช้ามาเริ่มดูกันทีละอย่างเลยครับผม


  • สเปกคราวๆ แรม 4GB LPDDR4 และมีหน่วยความจำทั้ง 32GB  และ 64GB  ใช้ Exynos 8890 และ GPU เป็น Mali T880 รันบนระบบ Android 6.0 Marshmallow


  • หน้าจอ Galaxy S7 มีขนาด 5.1” ส่วนหน้าจอ Galaxy S7 edge มีขนาด 5.5 นิ้ว ถือว่าเป็นมาตรฐานของสมัยนี้ไปแล้วครับ


  • ข้อมูลสำคัญจะแสดงบนหน้าจอตลอดเวลา เป็นการแสดงผลรูปแบบใหม่ที่เพิ่มเข้ามา และ คิดว่าค่ายอื่นจะตามกันมาเป็นกระบวนในอีกไม่ช้าแน่นอน


  • มาพร้อมคุณสมบัติในการกันน้ำกันฝุ่น ตามมาตรฐาน IP68


  • มีระบบซิมการ์ดแบบ Hybrid Slot พร้อมรองรับ SD card ถึง 200 จุใจจริงๆครับ

  • มาพร้อมกล้องหน้า 5MP และ f1.7 ส่วนกล้องหลังความละเอียด 12MP ย้ำ f1.7 !!!
  • ยังมาพร้อมระบบ Dual-Photodiode ที่ให้ภาพสว่างกว่าเดิม


  • Cover ที่มี Lens เอาใจคนชอบถ่ายภาพกันเลยทีเดียว (คิดว่าน่าจะต้องซื้อเพิ่มเอง)

  • Motion Panorama ที่สามารถเคลื่อนไหวได้ในแบบพาโนราม่า

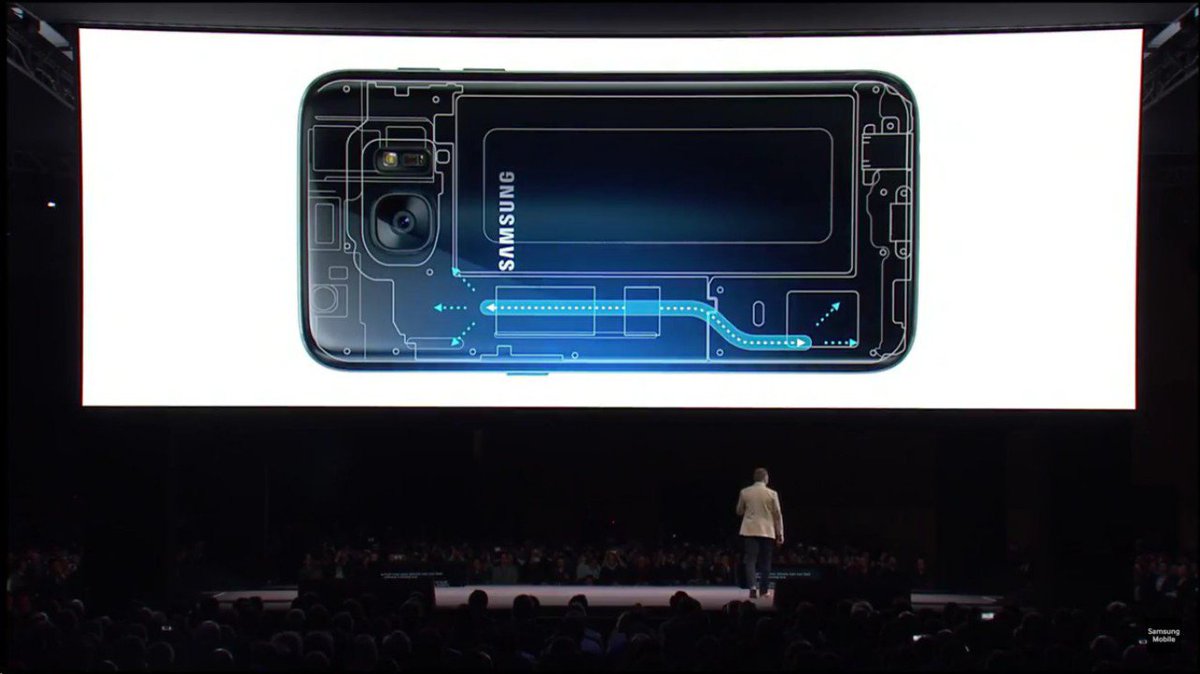
  • มีCPU ที่เร็วขึ้น GPU เร็วขึ้น มีระบบ Cooling ที่ดีขึ้น และแบตที่อึดขึ้น ต้องมาดูกันอีกทีครับว่าจะทำได้ดีแค่ไหนในเรื่องของความร้อน


  • มาพร้อม Vulkan ซึ่งเป็น Engine Game ใหม่ ที่จะมีใน S7 เป็นตัวแรกของโลก ต้องบอกว่าภาพนั้นสวยใสจริงๆครับ

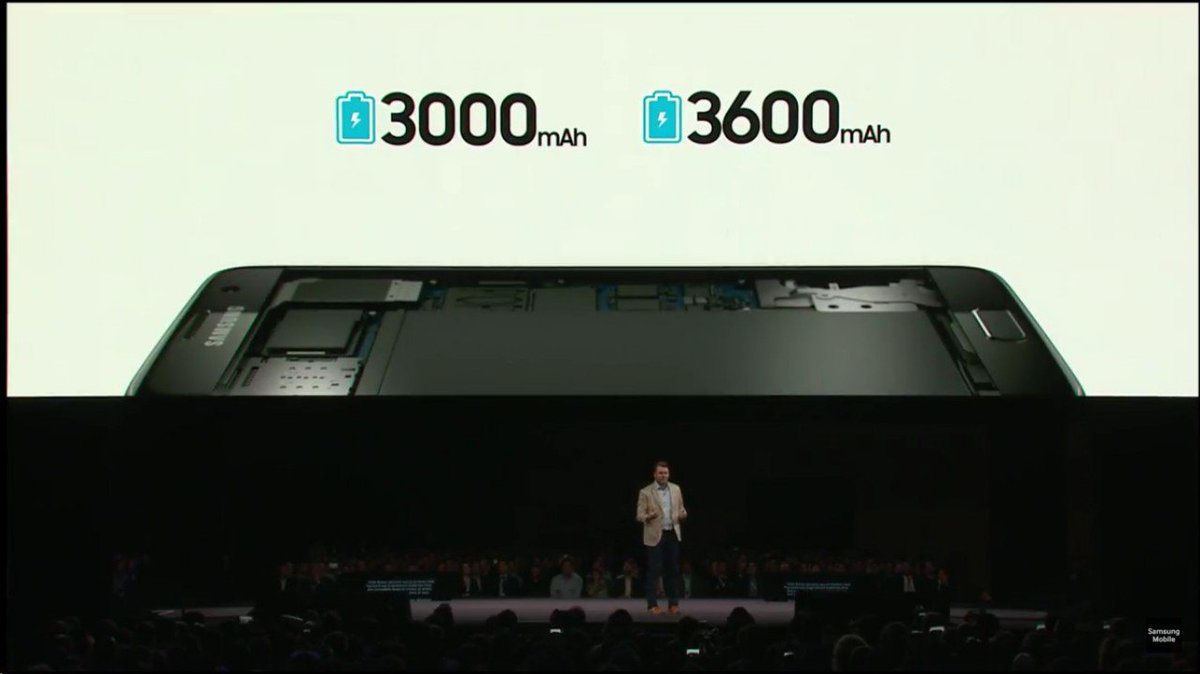
  • Galaxy S7 มีแบตเตอรี่ความจุ 3,000 mAh ส่วน S7 edge มีแบตเตอรี่ความจุถึง 3,600 mAh เรียกได้ว่าเล่นเกมกันได้ต่อเนื่องมากมันขึ้นนานขึ้น(หรือป่าว ฮ่าๆ)
  • Samsung Pay รองรับทั้ง MST และ NFC แล้วใน
  • Gear360 !!!!!!!!!! ของเล่นใหม่วัยรุ่น มาพร้อม F 2.0 หมุ่นกล้องเองได้ด้วยนะเออ สามารถถ่ายวีดีโอได้ในแบบ 360 องศาได้อีกด้วย ส่วนตัวผมว้าวมากๆครับกับสิ่งนี้ไม่รู้ว่าพอเอามาใช้งานจริงแล้วจะเป็นอย่างไรจะน่าสนใจจริงไหมต้องรอดู รีวิวกันต่อไปครับ

ภาพในงานเล่นเอาอยากไปมากเลยครับ

  • Mark Zuckerberg ก็มากับเขาด้วย!!!!!!

รีวิวตัวเต็มนั้นเราก็ต้องติดตามกันต่อไปครับว่า Samsung Galaxy S7 นั้นจะเจ๋ง หรือ เจ๊ง กันแน่!!! 


Sunday, February 21, 2016

ทำเกมส์ง่ายๆ ด้วย RPG maker MV

RPG maker MV  เป็นโปรแกรมสร้างเกมแนว RPG โดยเฉพาะเลยนะครับ นั้นคือไม่สามารถนำไปสร้างแนวอื่นได้เลยนั้นเอง ซึ่งผู้ผลิตก็ไม่ใช่ใครที่ไหน  KADOKAWA ผู้สร้างงานแอนนิเมชั่นมามากมายแล้วนั้นเอง


สำหรับคนที่ไม่มีพื้นฐานด้านโปรแกรมมิ่งเลยนั้นตัวเกมเดิมๆที่เขาให้มาสามารถนำไปเล่นได้เลยโดยไม่ต้องเขียนโปรแกรมเพิ่มเลยแม่แต่น้อย เป็นหน้าตาเกมพื้นฐานที่ให้มา

สำหรับคนที่ต้องการศึกษาเพิ่มผมจะพยายามนำโค้ดตัวอย่างมาอัปเดทให้ภายหลังครับ

RPGmakerMV เวอร์ชั่นใหม่นี้จะไม่ใช่ RUBY แล้วนะครับ จะเปลี่ยนมาเป็น HTML5 แล้ว Javascript แทน ทำให้การเขียนทำง่ายขึ้นมากๆครับ

ความโดดเด่นของโปรแกรมใน รุ่น RPGmakerMV นี้ ที่เด่นๆนั้นคือการสร้างตัวละครที่ง่าย

นี้เป็นภาพตัวอย่างนะครับเป็นซอฟต์แวร์ที่ติดมากับตัวโปรแกรมนะครับ 

ส่วนประกอบต่างๆนั้นมีเกือบครบแล้วสร้างกันสนุกมือเลยทีเดียว!!!

ละความง่ายอีกอย่างของมันก็คือการเพิ่มเนื้อเรื่องที่สามารถทำได้อย่างง่ายดายเลยจริงๆ


จากภาพจะเห็นว่าเราแทบไม่ต้องเขียนโค้ดอะไรใส่เข้าไปเลย ใช้แค่คำสั่ง HTML5 ธรรมด๊าธรรมดา ก็สามารถเติมสีสันต่างๆให้คำพูดของเราได้แล้ว  ทำให้การเรียงเหตุการก็ง่ายตามไปด้วยครับ


และคุณสมบัติเด่นที่เพิ่มเข้ามาแล้วโดนใจผมที่สุดเลยคือ สามารถ นำไปลงใน Android และ IOS ได้นั้นเอง ถูกใจผมมากครับอันนี้ ฮ่าๆ


ซึ่งอาจจะยากกว่าโปรแกรมอื่น ถ้าถามว่ายากมากไหมก็คงบอกว่านิดหน่อยครับเพราะต้องใช้เทคนิคนิดหน่อยครับ แต่ก็มีสอนมากมายใน ยูทูปเติมเดิมครับ อันนี้ผมนำมายกตัวอย่างครับ มองว่าเป็นวิธีที่ง่ายที่สุดแล้ว


ถึงจะบอกว่ายากแต่ก้ไม่กี่คลิกเท่านั้นครับ 

สุดท้ายนี้เป็นเรื่องของราคานะครับซึ่งอยู่ที่ 1319 บาทนะครับ ก็เป็นราคาที่พอรับได้ครับสำหรับคุณสมบัติต่างๆที่อยู่ข้างใน ถ้าเพื่อนคิดมากซื้อไม่ไหว ก็มีเวอร์ชั่นเก่าให้ซื้ออยู่นะครับ ซึ่งราคาก็ลดลงมาตามๆกันแต่นั้นหมายถึงฟังชั่นที่หายไปด้วยนะครับ  

ใครอย่างลองก็จัดมาเลยครับ  อย่ากลัวที่จะเริ่มต้นกับสิ่งที่เรารักครับ 


Comments system

Disqus Shortname

Disqus Shortname

Comments system